Are you looking to explore the fascinating world of gardening and want to learn how to grow rutabaga from scraps? Rutabagas, also known as swedes or neaps, are not only delicious but also a rewarding vegetable to cultivate. In this comprehensive guide, we will walk you through the step-by-step process of growing rutabaga from kitchen scraps. With the right techniques and a little patience, you’ll soon have a bountiful harvest of these nutritious root vegetables right in your backyard.
Selecting Best Scraps for Grow Rutabaga from Scraps
To start your rutabaga growing journey, you’ll need the right scraps. Look for rutabagas that have healthy tops, and ensure that they are free from any signs of rot or disease. The scraps you choose will determine the success of your gardening endeavor, so pick the best quality rutabagas for optimal results.
Preparing Your Rutabaga Scraps
Once you have your rutabaga scraps, it’s time to prepare them for planting. Follow these steps to get your scraps ready:
Cutting the Tops
Take a sharp knife and carefully cut the tops of the rutabagas, leaving about two inches of the root attached. These tops will be the key to growing your rutabaga plant, so handle them with care.
Drying and Healing
Place the cut tops in a cool, dry place for a few days to allow the cut ends to heal and callus. This prevents rot and helps the plants establish roots more effectively.
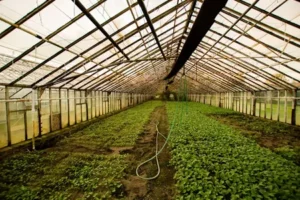
Choosing the Right Location
Rutabagas thrive in well-draining soil and full sun. Select a suitable spot in your garden that receives at least six hours of sunlight daily. Make sure the soil is loamy and has good drainage to prevent waterlogging, which can harm the roots.
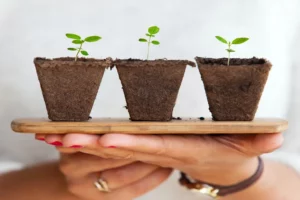
Planting Your Rutabaga Scraps
Now that your rutabaga scraps are prepared and you’ve found the perfect location, it’s time to plant them. Follow these steps to get your rutabagas in the ground:
Digging Holes
Using a garden trowel, dig small holes in the prepared soil. Ensure that the holes are deep enough to accommodate the cut tops of the rutabaga scraps.
Planting the Scraps
Place the rutabaga tops in the holes, cut side down, and cover them with soil. Make sure the tops are about 1-2 inches below the surface.
Spacing
Leave adequate spacing between the planted scraps, approximately 4-6 inches apart. This gives them room to grow and expand.
Caring for Your Growing Rutabagas
Rutabagas are relatively easy to care for, but they do require some attention to ensure healthy growth. Here are some essential care tips:
Watering
Keep the soil consistently moist but not waterlogged. Rutabagas prefer even moisture, so water them when the top inch of soil feels dry.
Fertilizing
Apply a balanced, all-purpose fertilizer during the grow rutabaga from scraps to provide essential nutrients to your rutabaga plants.
Pest Control
Monitor for common garden pests and take appropriate measures to protect your rutabagas. Use organic pest control methods wherever possible.
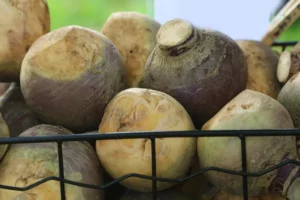
Harvesting Rutabagas
Rutabagas are usually ready to harvest within 90-120 days. Here’s how to know when they’re ready:
Size
When rutabagas reach about 3-4 inches in diameter, they are ready to be harvested.
Loosen the Soil
Gently loosen the soil around the rutabaga to make it easier to pull out.
Harvesting
Grab the rutabaga by the greens and pull it gently from the soil. Use organic pest control methods wherever possible.
Enjoying Your Homegrown Rutabagas
Once you’ve harvested your rutabagas, it’s time to enjoy the fruits of your labor. Rutabagas can be used in a variety of delicious recipes, from roasted rutabaga fries to hearty stews and soups. The satisfaction of growing your own vegetables and enjoying their fresh, earthy flavors is truly rewarding.
Can I plant a rutabaga that has sprouted?
Planting a rutabaga that has sprouted can be a rewarding gardening endeavor. Rutabagas are root vegetables that, when they sprout, typically develop green shoots and leaves. If you’ve stored a rutabaga for an extended period and it has started to sprout, you have the option to plant it in your garden or a suitable container. To do this, select a sunny location with well-drained soil. Gently separate the sprouted rutabaga from the main root, ensuring that each sprout has its own portion of the root attached. Plant these sprouted sections about 1 to 2 inches deep in the soil, spacing them a few inches apart. Keep the soil consistently moist, and in a few weeks, you should see healthy rutabaga plants growing. Harvest the roots once they reach a desirable size for a fresh and homegrown addition to your meals. Planting sprouted rutabagas can be a sustainable way to enjoy this nutritious vegetable while reducing food waste.
Can you regrow a rutabaga?
Regrowing rutabaga, much like regrowing other vegetables, is an intriguing and sustainable way to make the most of your kitchen scraps. Rutabagas are root vegetables known for their earthy, sweet flavor and nutritional value. While it’s not as common as regrowing herbs or leafy greens, you can indeed regrow rutabagas from their scraps. To start, choose a healthy rutabaga with a firm root end. Cut off the top portion, leaving about an inch or two of the root intact. The top part can be used for cooking, while the root end will serve as the basis for regrowth. Place the root end in a shallow container with water, ensuring that the cut end is submerged. Change the water regularly and keep the container in a sunny spot. Over time, you’ll notice new shoots and leaves emerging. Once these grow large enough, you can transplant them into the soil to continue their growth. Regrowing rutabagas not only reduces food waste but also provides a rewarding and sustainable gardening experience.
How much time does a rutabaga take to grow?
Growing rutabagas is a rewarding gardening venture, but it requires some patience. The time it takes to grow a rutabaga from seed to harvest typically spans 90 to 120 days. Rutabagas are a cool-season root vegetable, so they thrive in cooler temperatures. Planting seeds in early spring or late summer is ideal for most regions. These hearty vegetables require well-drained soil, plenty of sunlight, and consistent moisture to reach their full potential. The rutabaga’s growth can be divided into several stages: germination, leafy growth, root development, and maturity. Germination usually occurs within a week or two after planting, and the plant will go through gradual stages of growth before forming the swollen root that we ultimately harvest. By practicing proper care and providing the necessary conditions, you can look forward to a bountiful rutabaga harvest in just a few months.
How do you germinate rutabagas?
Germinating rutabagas is a straightforward process that can be achieved with a few essential steps. Rutabagas, a nutritious root vegetable, are known for their sweet and earthy flavor. To start the germination process, first select high-quality rutabaga seeds. It’s essential to plant them in the right season, typically in the early spring or late summer, depending on your climate. Begin by preparing a well-draining and fertile soil bed in a sunny location, as rutabagas thrive in full sun. Sow the seeds about half an inch deep and ensure they are spaced at least 2 inches apart. To keep the soil damp but not soggy, water it frequently. Rutabagas typically take 10-14 days to germinate, and once the seedlings have emerged, thin them out, leaving the healthiest plants with enough space to grow. With proper care and attention, your rutabaga seeds will sprout, leading to a bountiful harvest of this delicious and versatile root vegetable.
In conclusion
To Grow rutabaga from scraps is a gratifying and sustainable gardening endeavor. By following these step-by-step instructions, you can cultivate these nutritious root vegetables in your own backyard. Whether you’re an experienced gardener or a novice, the process is simple and the results are delicious. So, roll up your sleeves, get your hands dirty, and start growing your own rutabagas today!